Did you know that birch trees produce sap like maple trees? This sap can be used to make syrup, or you can drink it straight for a tasty and refreshing treat. If you want to learn how to tap a birch tree, keep reading. We’ll discuss all you need to know about collecting birch sap and making syrup.
What You'll Learn Today
What Time of Year Do You Tap Birch Trees?
Birch trees produce lots of delicious sap each spring. The sap flows for several weeks during early to mid spring, usually a little later than maple sap.
You’ll want to tap your trees when daytime temperatures are consistently around 40 to 60 degrees Fahrenheit and overnight temperatures are consistently above freezing.
In many regions, birch sap season begins in March or April, just before the trees begin to leaf out. Depending on variances in weather, the sap may not start flowing until May in some colder climates.
What Kinds of Birch Trees Can You Tap?
You can tap all species of birch tree. Some commonly tapped birches in the U.S. are Alaskan paper birch, black birch, silver birch, and white birch.
You’ll want to choose healthy, well established trees for tapping. The trees should be at least 10 inches in diameter and show no signs of decay or disease.
It’s also important to choose unpolluted trees. Make sure the trees you tap have not been sprayed with pesticides or exposed to harsh chemicals of any kind.
How Do You Tap a Birch Tree for Sap?
Before tapping your own birch trees, it’s a good idea to watch a tutorial video to get a good idea about the process. Check out either of the ones below:
Once you’re ready to start, follow these basic steps:
Prepare Tap Holes
First, clean off the surface of the tree. It may have loose pieces of bark or moss growing on its surface that you can simply brush away with your hand.
Next, using a 7/16 inch drill bit, drill a small hole in the tree, slanting it slightly upward. Make sure the hole is at least 6 inches from any other holes from previous years.
It’s best to place your holes on the south side of the tree, as this side gets the most sunlight and the sap will be flowing most readily. That said, you’ll need to check the sap often, at least once a day, to make sure it doesn’t spoil in the warm sunshine.
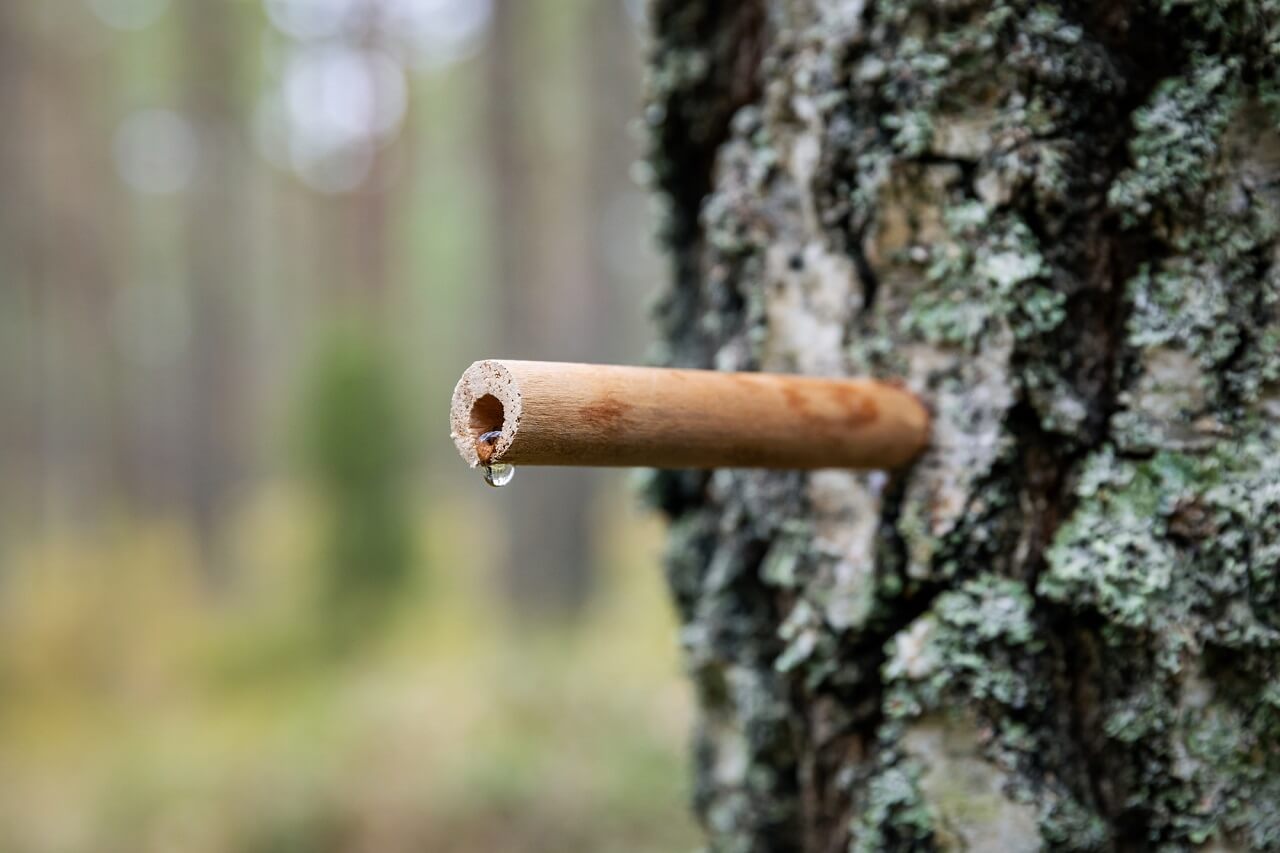
Place Your Spiles
Ideally, you’ll want to use metal spiles that have been sterilized beforehand, but you can use any tube-like object that will fit in your hole. Place one spile in each hole, tapping it with a hammer to wedge it in place.
Be careful not to tap the spile too hard or force it too far into the tree trunk; this could damage the tree. The spiles should fit securely but should not look like they’re buried in the wood.
The sap will have begun flowing as soon as you drilled your holes, and it will continue flowing as you place your spiles, so the job could get slightly sticky.
Hang a Bucket Under the Spile
You can use any kind of bucket, bowl, or pitcher that you can secure beneath the spile. Most spiles have a hook that you can use to hang your bucket from.
It’s best if your bucket can hold at least one gallon, but if you need to use something smaller, that’s okay. You may just need to collect the sap more often than you would if you were using a larger bucket.
You can cover the buckets if you want, but it’s not necessary. Just check them at least once a day and strain it if necessary when you collect it.
Collect the Sap
Check on your buckets every day, sometimes two or three times a day if you’re using smaller buckets for catching the sap. Once a day, or more if the buckets are full, pour the sap into large containers and take them inside.
As mentioned, you may want to strain the sap at this point. If so, pour it through a sieve lined with cheesecloth.
You can drink the sap straight if you prefer–it tastes a bit like sweet, nutty water. You can store the fresh sap in the fridge for a day or two, or you can boil it down and turn it into syrup.
How to Make Birch Syrup?
Birch syrup looks similar to maple syrup but tastes distinctly different. It is very rich and has a caramely, slightly nutty, slightly toasted flavor.
It can take up to 120 gallons of sap to make just one gallon of syrup, so you’ll want to collect as much sap as possible before starting.
For a detailed, step-by-step tutorial on how to make birch syrup, check out this article from Alaska Wild Harvest.
Or, you can simply follow the steps below:
Reduce the Sap as You Collect It
To preserve the sap for longer than a day or two, you can reduce it by cooking it down until it turns a light yellow color–about 4 hours at a low simmer. Store this reduced sap in a cool place such as in the fridge or buried in the snow.
Your reduced sap should keep until the end of the sap season, when it can be cooked down all at once. This will allow you to get the greatest amount of syrup.
Cook it Down
When you’re ready to make your syrup, pour all of your sap into large cook pots.
You can cook down the sap on an outdoor stove, an indoor wood burning stove, or a conventional stovetop. Keep in mind though, if you cook it indoors, it will produce a lot of steam that will fill the house with humidity.
Use a candy thermometer to monitor the temperature of the sap. It should remain fairly constant around 200 degrees Fahrenheit; you want it to simmer and produce steam, but not boil.
The simmering process may take over 12 hours depending on how much sap you have. As it cooks down, consolidate it until you have it all in one large pot.
When it’s close to being done, the sap should have a similar appearance with natural maple syrup, but will be a lot thinner.
Turn Up the Heat
When the sap is almost done cooking, crank the heat up to 220 degrees Fahrenheit. This will bring it to a slow boil, which will sterilize the syrup.
There’s no need to leave it at this temperature for very long; simply allow it to heat up to 220 degrees, then remove it from the heat.
Put the Syrup in Jars
Strain your birch syrup through a double layer of cheesecloth. This will remove the hard, grainy bits of sugar that form during the process of cooking down.
Pour the syrup into sterilized jars and place sterilized lids on the jars. They should self-seal because of the heat; if they don’t, store them in the fridge.
As long as they seal properly, the jars are shelf-stable. You can keep them in your pantry for up to a year.
How to Tap a Birch Tree For Water?
You may have heard the term “birch water” and wondered what it meant. Can you actually get water out of birch trees, and if so, how do you do it?
The truth is, birch trees don’t actually produce water. Birch water is simply another name for the sap, which looks like water and has a mild, sweet flavor.
There is no special method for getting water out of a birch tree. To tap a birch for sap, simply follow the steps above.
Conclusion
You can tap birch trees to collect sap in much the same way as you do with maple trees. If you follow the steps above, you’ll soon have your own jars of homemade birch syrup. Check this guide about growing a new birch tree.
Lovely! I grew up in New England and we often tap maples for their sap to boil down into syrup. Back then I did not know that birch trees would be tapped as well.